| Color | Primary survey type available |
| Red | >600 orbits |
| Purple | Ultra-deep |
| Orange | Deep |
| Yellow | Pencil |
| Green | Moderate |
| Blue | Shallow |
| Dark blue | Filler |
| Black | None; violates primary survey constraints |
Make sure that your environment path includes /proj/wire/so_ops/bin,
as this is where plansky has been installed. Check this by changing
to any working directory and executing
which plansky
from a terminal window. To run PLANSKY, type:
plansky
You should then see
PLANSKY input files in /proj/wire/soda/so/plansky/
TILES executing from /proj/wire/so_ops/bin
PLANQUERY executing from /proj/wire/so_ops/bin
Planner input files in /proj/wire/so_ops/data/isoev
Planner file reference: DGH_sf

Zoom factor (for zpi function) = 10
Orbit period (minutes) = 95.39424
Moon-violation threshold angle (degrees) = 8

plansky, CVS-version 4.30 1999/02/26 22:49:13

Primary-science tile types:

       Type   Width    Height
         u      81    38.0776
         d      81    38.0776
         m      27    38.0776
         s      27    24.4919
         p      16    24.4919
         f      27    24.4919

AI-science and other tile types:

       Type   Width    Height
         a       1    18.5796
         b       1    38.0776
         e       1    24.4919
         g       1    18.5796
         j       1    18.5796
         k       3    24.4919
         n       1    35.0586
         o      27    24.4919
         q       1    35.0586


Enter commands (? for help).
>
The directories from which plansky gets the files it needs can be changed with environment variables (see below). Note that the default setup is for moderate-evolution planning.
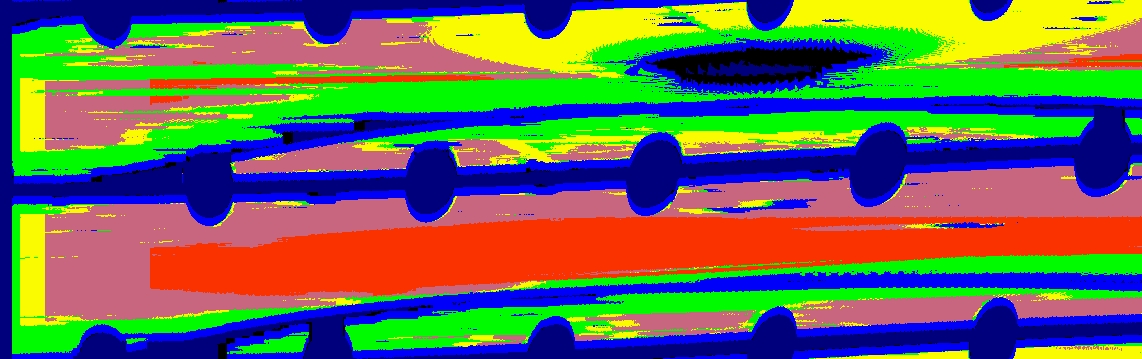
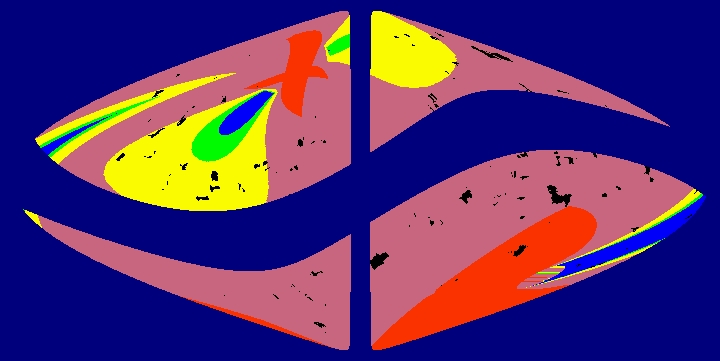
At this point you must initialize plansky with the
in
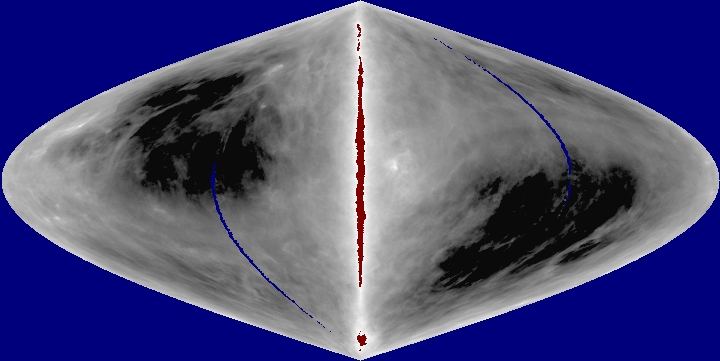
command, which will display three different images: 1) an orbital map
with color contours, 2) an inertial map with color contours
(Sanson-Flamsteed projection), and 3) an inertial map of 100-µm
IRAS cirrus measurements (Sanson-Flamsteed projection). The images that
are displayed are similar to those shown below; they differ with
evolution scenario.
| Color | Primary survey type available |
| Red | >600 orbits |
| Purple | Ultra-deep |
| Orange | Deep |
| Yellow | Pencil |
| Green | Moderate |
| Blue | Shallow |
| Dark blue | Filler |
| Black | None; violates primary survey constraints |
After suitably arranging the displayed maps on your computer screen, you must then get into the planner mode with the
pl
command. The next section describes the available functions
in the planner mode. These functions allow you to plot survey tiles
on the orbital map and coresponding positions where the WIRE telescope
can look on the inertial maps, subject to viewing and survey
constraints of the WIRE primary science mission.
In the tables below:
List of PLANSKY planner commands and brief descriptions:
| Planner command | Brief description |
| u|d|m|s|p|f 2i|2o [nos] | Add tile(s) and plot assoc. (RA, Dec) |
| spe tilefilename [forb# lorb#] | Specify tile filename for storing tile data, with optional orbit range for tile redrawing on orbital map |
| ref [tilefilename] | Specify/un-specify reference tile filename |
| red [tilefilename] [forb# lorb#] | Quickly redraw tiles on orbital map in specified orbit range |
| all [tilefilename] | Redraw tiles on orbital map and targets on inertial map |
| new | Erase tiles/symbols; undefines tile filename |
| mov [x y] | Move selected tile |
| del [x y] | Delete selected tile |
| whe [tile #] | Give information about selected tile |
| gap | Give gap/overlap amount between two tiles |
| ali | Align selected tile with another tile |
| loc | Lock selected tile |
| unl | Unlock selected tile |
| tar u|d|m|s|p|f RA Dec [orbit#] [#repeats] [note] | Add tile targeted at (RA, Dec, orbit#) if Moon-constraint satisfied; #repeats activates tile replicator at successive orbits; note is included with tiles |
| ret RA Dec | Target or retarget an existing tile if Moon-constraint satisfied |
| not[tile#] text and text | Store note with selected tile |
| bsel [filenamebase] | Tile block create/select/deselect |
| bund | Undefine current tile block |
| tin | Include selected tile in current tile block |
| tex | Exclude selected tile from current tile block |
| bmov [dx dy] | Move current tile block |
| bali | Align current tile block with an outside tile |
| zpi | Zoom in on orbital map with zoom factor specified by environment variable PLANSKYZOOM |
| zpo | Zoom out on orbital map to original magnification of 1 |
| pc command | Execute planquery command |
| ? | Show list of planner commands |
| ^d (control-d) | Exit planner |
Detailed description of PLANSKY planner commands:
| Planner command | Description |
| u|d|m|s|p|f 2i|2o [nos] | Plot a tile on the orbital map, and corresponding (RA, Dec) points on the inertial map, if 2i is specified. Use the mouse (middle button) to position the tile. Planquery computes the (RA, Dec) points based on the selected tile position. Tile data are automatically stored in a data file, if specified (see spe command below). If instead 2o is specified, use the mouse (left button) to select a (RA, Dec) point on the inertial map, and the corresponding allowed tiles will be computed by Planquery and plotted on the orbital map. The nos option allows tiles and points to be plotted on the maps without saving them to a tile data file. |
| spe tilefilename [forb# lorb#] | Specify a filename in which to store tile data (in the current directory, unless otherwise specified). If the specified tile file already exists, then its tiles will be plotted on the orbital map. The all command (see below) must be manually executed for the corresponding inertial-map positions to be computed and displayed. Specify (forb#, lorb#) for limiting orbit range over which tiles are drawn on orbital map (speeds up display). |
| ref [tilefilename] | Specify and display reference tile filename. Reference tiles are indicated on the orbital map by filled cyan circles at their centers. Inertial map symbols are not plotted for reference tiles. No modifications are made by plansky to reference tile files (only active tile files are modified). If no reference tile filename is specified, then the current reference tile file (if any) becomes undefined. Identical active and reference tile filenames are not allowed. |
| red [tilefilename] [forb# lorb#] | Redraw tiles on the orbital map (the orbital and inertial maps are first erased). To speed-up the tile display, the corresponding (RA, Dec) points on the inertial map are NOT plotted. The tile data are input from tilefilename. If tilefilename is not specified, then the previously defined tilefilename is assumed. Must manually execute the all command (see below) for the corresponding inertial-map positions to be computed and displayed. Specify (forb#, lorb#) for limiting orbit range over which tiles are drawn on orbital map (speeds up display). |
| all [tilefilename] | Redraw tiles on the orbital map and corresponding (RA, Dec) points on the inertial map (the maps are first erased). The tile data are input from tilefilename. Planquery is executed to calculate the (RA, Dec) points based on the tile data. Tiles that violate constraints are indicated on the orbital map by large cyan tri-leg crosses at their centers. If tilefilename is not specified, then the previously defined tilefilename is assumed. |
| new | Erase tiles from the orbital map and symbols from the inertial map, and set tilefilename to be undefined (this will necessitate the subsequent execution of either spe tilefilename or red tilefilename in order to redefine a filename in which to store tile data. |
| mov [x y] | Move a tile that is selected with the mouse (middle button) to a position that is selected either by using the mouse (middle button) or by specifying the position on the command line. A locked tile cannot be moved (see loc command below). Movement of a targeted tile is allowed, and the user will be warned in this event (see tar command below); however, note that tile-data-file target-position fields are not cleared in this event. |
| del [x y] | Delete a tile that is selected with the mouse (middle button). Tile can also be selected by specifying the position on the command line. A locked tile cannot be deleted (see loc command below). |
| whe [tile #] | Display information about a tile selected by using the mouse (middle button). Tile type, and center coordinates (orbit # and angle from ascending node in deg.) on the orbital map are given. If the tile has been annotated (see not command below), the annotation will be displayed. If applicable, targeted and/or selected equatorial coordinates for the tile will be displayed. Optionally, if tile # is specified, mark that tile with a white dot on the orbital map. |
| gap | Display the amount of either overlap or separation between selected parallel edges of two different tiles (computes position of second tile edge selected minus position of first tile edge selected). The tiles are sequentially selected by using the mouse (middle button). When selecting the tiles, the mouse cursor should be placed within the desired tile near the tile edge of interest. The edge information is used to determine which edges are used when the gap/overlap is computed. |
| ali | Align one tile with another tile by moving the first tile into alignment with the second. The two tiles are sequentially selected by using the mouse (middle button). When selecting the first tile, the mouse cursor should be placed within the desired tile near the tile edge of interest. When selecting the second tile, the mouse cursor should also be placed within the desired tile near the tile edge of interest. Alignment is separately done in either the orbit-# or angle-from-ascending node dimensions. Alignment in the orbit-# dimension between opposite edges is done so the two tiles do not occupy the same orbit, whereas alignment between similar edges is done so these edges occupy the same orbit. A locked tile cannot be aligned (see loc command below). |
| loc | Lock a tile that is selected with the mouse (middle button). Prevents the tile from being moved, deleted, or aligned (must unlock tile in order to do so--see unl command below). Upon execution of the red command, each locked tile is indicated on the orbital map by a small circle drawn inside the tile at the tile center. |
| unl | Unlock a tile that is selected with the mouse (middle button). Undoes the effects of the loc command. This command must be executed on a locked tile before that tile can be moved, deleted or aligned. |
| tar u|d|m|s|p|f RA Dec [orbit#] [#repeats] [note] | Add a tile at a user-specified orbit # to the orbital map
corresponding to a user-targeted observing location. Equatorial coordinates
(RA, Dec) for the target can be specified in one of
three different ways:
1. # # (both in decimal degrees; decimal points optional) 2. #d#m#s #d#m#s (both in deg., min., and sec.) 3. #h#m#s #d#m#s (RA in hrs., min., and sec.) Decimal and sexagecimal numbers may not be mixed. Planquery is then executed to compute the ascending-node angle for the tile, and the allowed orbital range of the tile at the associated allowed ascending-node angles are displayed. If the orbit # has not already been specified on the command line, it can be specified at this time using the mouse (middle button). A warning message will be displayed if the chosen orbit number does not fall within the allowed orbital range. Specify #repeats to add a number of targeted tiles starting at the specified orbit# and repeating at successive orbits (useful for targeting multiple tiles that are 1-orbit wide). Specify note for inclusion of same note with multiple targeted tiles. Includes Moon-violation checking, that the tile's target is not within a certain angular distance from the Moon. This checking is independent of planquery. The default minimum separation angle between the telescope boresight and the Moon's center is 8 degrees, but this value can be overridden with the environment variable MOONMINANGLE. Tiles with Moon violations are not targeted. |
| ret RA Dec | Allows an existing tile to be either targeted or retargeted.
Equatorial coordinates
(RA, Dec) for the target can be specified in one of
three different ways:
1. # # (both in decimal degrees; decimal points optional) 2. #d#m#s #d#m#s (both in deg., min., and sec.) 3. #h#m#s #d#m#s (RA in hrs., min., and sec.) Decimal and sexagecimal numbers may not be mixed. Planquery is then executed to compute the ascending-node angle for the tile, and the allowed orbital range of the tile at the associated allowed ascending-node angles are displayed. If the orbit # has not already been specified on the command line, it can be specified at this time using the mouse (middle button). A warning message will be displayed if the chosen orbit number does not fall within the allowed orbital range. Includes Moon-violation checking, that a tile's target is not within a certain angular distance from the Moon. This checking is independent of planquery. The default minimum separation angle between the telescope boresight and the Moon's center is 8 degrees, but this value can be overridden with the environment variable MOONMINANGLE. Tiles with Moon violations are not retargeted. |
| not[tile#] text and more text | Store an annotation (up to 50 chars., including spaces) in tilefilename with a tile that is selected either by using the mouse (middle button), or by specifying the tile # (no whitespace between "not" and the tile #). Upon execution of the red command, each annotated tile is indicated on the orbital map by a small rectangle drawn inside the tile at the tile center. |
| bsel [filenamebase] | Create a tile block, or group of tiles. Tiles in a given tile block are displayed on the orbital map with brown borders; tiles not in the tile block are displayed with white or yellow borders. Information about tile membership in a given tile block will be stored in tileblock_filenamebase.dat. If the tile block already exists, then it will be selected with this command. If no filenamebase is given, then the current tile block is deselected. |
| bund | Undefine the current tile block by deleting the associated tileblock_filenamebase.dat file. |
| tin | Include a selected tile in the current tile block. Use the mouse (middle button) to select the desired tile. Information about the selected tile will be included in the associated tileblock_filenamebase.dat file. |
| tex | Exclude a selected tile from the current tile block. Use the mouse (middle button) to select the desired tile. Information about the selected tile will be removed from the associated tileblock_filenamebase.dat file. |
| bmov [dx dy] | Move the current tile block. Not allowed if a tile in the current tile block is locked. If dx and dy, the changes in orbit # and orbital angle, are given, then the tiles in the current tile block will be moved automatically. If no values of dx and dy are given, use the mouse (middle button) to select one of the tiles in the current tile block, move the tile to the desired new position, and hit the mouse middle button to drop the tile; the rest of the tiles in the current tile block will be moved automatically. |
| bali | Align current tile block with a tile outside of the block by moving the tile block as needed. Not allowed if a tile in the current tile block is locked. CAUTION: tile-block membership is not checked for code simplicity. Use the mouse (middle button) to first select a tile in the current tile block and then to select a tile outside of the block. When selecting the first tile, the mouse cursor should be placed within the desired tile near the tile edge of interest. When selecting the second tile, the mouse cursor should also be placed within the desired tile near the tile edge of interest. Alignment is separately done in either the orbit-# or angle-from-ascending node dimensions. Alignment in the orbit-# dimension between opposite edges is done so the two tiles do not occupy the same orbit, whereas alignment between similar edges is done so these edges occupy the same orbit. |
| zpi | Pan and zoom in on orbital map with the magnification factor specified by environment variable PLANSKYZOOM. Use the mouse to select the pan position. |
| zpo | Zoom out on orbital map to original magnification of 1. |
| pc command | Execute the planquery function specified by command. |
| ? | Show list of planner commands. |
| ^d (control-d) | Exit planner mode of PLANSKY. |
Note that the tile size definitions given in this section are subject to change, due to changes in orbit characteristics, integration times, bug fixes, etc. The definitions should stabilize as we approach our launch date. The user should look for changes each time a new set of plansky input files for a given evolution scenario is created (look for changes in the default paths and filename suffixes set and displayed by plansky when it is first executed). The most up-to-date area-definition file information is summarized in the ADFsummary output tables.
Survey area (tile) size definitions for the no-evolution scenario:
| Type | Symbol | No. of orbits spanned | Orbital angular range (degrees) | Number of WIRE fields |
| Ultra-deep | u | 400 | 43.479664 | 1x1 |
| Deep | d | 180 | 43.479664 | 3x3 (1 deep field surrounded by 8 moderate fields) |
| Moderate | m | 90 | 43.479664 | 3x3 |
| Shallow | s | 45 | 26.874909 | 3x3 |
| Pencil | p | 100 | 43.479664 | 1x1 (1 deep field) |
| Filler | f | 45 | 26.874909 | 3x3 (Covers different inertial space than the shallow-tile case.) |
Survey area (tile) size definitions for the moderate-evolution
scenario (v327_moderate_evolution_files):
| Type | Symbol | No. of orbits spanned | Orbital angular range (degrees) | Number of WIRE fields |
| Ultra-deep | u | 180 | 43.479664 | 1x1 |
| Deep | d | 180 | 43.479664 | 3x3 (9 deep fields) |
| Moderate | m | 45 | 43.479664 | 3x3 |
| Shallow | s | 45 | 26.874909 | 3x3 |
| Pencil | p | 80 | 43.479664 | 2x2 (4 deep fields) |
| Filler | f | 45 | 26.874909 | 3x3 (Covers different inertial space than the shallow-tile case.) |
Survey area (tile) size definitions for the strong-evolution
scenario (v406_strong_evolution_files):
| Type | Symbol | No. of orbits spanned | Orbital angular range (degrees) | Number of WIRE fields |
| Ultra-deep | u | 180 | 43.479664 | 2x2 (40 segments per field, 20 spares) |
| Deep | d | 90 | 43.479664 | 3x7 (4 segments per field, 6 spares) |
| Moderate | m | 50 | 43.479664 | 3x5 (3 segments per field, 5 spares) |
| Shallow | s | 45 | 26.874909 | 3x7 (2 segments per field, 3 spares) |
| Pencil | p | 45 | 43.479664 | 1x1 |
| Filler | f | 45 | 26.874909 | 3x7 (2 segments per field, 3 spares) |
Survey area (tile) size definitions for AI-science planning for the
moderate-evolution scenario (v400_moderate_evolution_files):
| Type | Symbol | No. of orbits spanned | Orbital angular range (degrees) | Segment integration time (sec) | Dither pattern (area definition filename) |
| AI-standard | b | 1 | 43.4797 | 8x14x4=448 | ai_eclip |
| AI-short | e | 1 | 26.8749 | 8x7x4=224* | ai_strip |
| AI-2 | g (a2) | 1 | 27.5039 | 8x16x2=256 | ai_psf02 |
| AI-1 | a | 1 | 18.5725 | 8x16x1=128 | ai_psf01 |
| AI-1b | j | 1 | 18.5725 | 8x16x1=128 | ai_mcmap |
Other survey area (tile) size definitions for the
moderate-evolution scenario (v329_moderate_evolution_files):
| Type | Symbol | No. of orbits spanned | Orbital angular range (degrees) | Segment integration time (sec) |
| Standard calibration | c | 1 | 27.6297 | 5x14x4=280 |
| High-flux calibration | h | 1 | 19.0757 | 5x16x2=160 |
Spacecraft pointings out of the orbit plane between 1.8 degrees anti-sunward and 22 degrees sunward are allowed for tile types with a ~43-degree height. Spacecraft pointings out of the orbit plane between 22.3 degrees anti-sunward and 39 degrees sunward are allowed for tile types with a ~27-degree height.
There are nine different PLANSKY environment variables that can be manually set to override certain default file paths and names that specify various files used by PLANSKY (see the table below). TARGET refers to the target directory specified in the make process.
| Environment variable | Description | Defaults |
| PLANSKYROOT | Path to generic plansky input files | /proj/wire/soda/so/plansky |
| PLANQUERYROOT | Path to planquery | /proj/wire/TARGET/bin |
| TILEROOT | Path to tile-file manipulation code | /proj/wire/TARGET/bin |
| PLANROOT | Path to evolution-scenario-dependent input files | /proj/wire/TARGET/data/isoev |
| PLANPROJECT | Filename suffix for *.zzh evolution-scenario-dependent image files in directory specified by PLANROOT | DGH_sf |
| PLANSKYZOOM | Zoom factor for the zpi function. | 10 |
| ORBITPERIOD | Orbit period of circular planning orbit. | 95.39424 minutes |
| MOONMINANGLE | Minimum separatation angle between tile's target and Moon's center. | 8 degrees |
| PLANSKYCOLORTABLE | Controls color contours on orbital map. | Undefined; set to "gray" or "grey" to replace color contours with uniform gray background. |
To set an environment variable, use the setenv command. For example,
setenv PLANQUERYROOT /proj/wire/mydir
When PLANSKY is executed, a list of the current environment-variable settings are displayed at the very beginning of the PLANSKY session.
To revert an environment variable back to the default setting, use the
unsetenv command. For example,
unsetenv PLANQUERYROOT
If an output filename is specified via planner command, then information about the tiles subsequently put down on the orbital map is stored in the file in ASCII data format. For each tile, a set of fields is reserved for storing information about the tile. The first line in the file is a header which defines the tab-separated fields in the file. The field labels themselves in the header line are also tab-separated. The field labels, in order from left to right in the file, along with their definitions, are given in the table below.
| Field label | Definition |
| Tile_no | Internal plansky tile number |
| Type | Symbol for survey type (e.g., u, d, m, s, p, f) |
| T_Color | Color of inertial map symbol (u=red, d=orange, m=green, s=blue, p=yellow, f=light blue) |
| Hght | Orbital angular span of tile (decimal degrees) |
| Width | Orbit # span of tile |
| x-tcent-f | Orbit # of tile center |
| y-tcenter | Orbit angle of tile center (decimal degrees) |
| AreaID | Tile number unique to all tile-data files created |
| Ref_no | Currently not used |
| refedge | Currently not used |
| thisedg | Currently not used |
| x-anc | Currently not used |
| y-anc | Currently not used |
| Lock | Tile lock flag (0=unlocked, 1=locked) |
| RA | Right ascension of tile target (12 characters) |
| Dec | Declination of tile target (12 characters) |
| Note_field | 50-character note field |
| selra | Right ascension of tile target selected with WIRESKY (12 characters) |
| seldec | Declination of tile target selected with WIRESKY (12 characters) |
Last revised: March 15, 1999
Software developer: Russ Laher (laher@ipac.caltech.edu) (early versions of plansky by Tim Conrow and Nick Gautier)
URL: http://spider.ipac.caltech.edu/staff/laher/plansky2.html