Time Series Viewer: Saving Results
There are several different ways to save results of analysis done in
the Time Series Viewer.
Contents:
+Tables
+Plots
+Single Images
+Multiple Images
On the upper right of any table shown in the tool, there is a diskette
option:  . Click on this icon to save the
table as an IPAC table (which is a variant of plain text).
. Click on this icon to save the
table as an IPAC table (which is a variant of plain text).
Believe it or not, the best way to save any plots shown in the tool
right now is to take a screen snapshot. On a Mac, this is accomplished
via holding down command, then shift, then 4, then let go and your
mouse cursor changes. Hit the space bar to select the window over
which your mouse is hovering. Your mouse cursor changes again, and hit
the mouse button. A snapshot is then saved to your Desktop, tagged
with the date and time.
If you want to save a single image, click on the image you want to
save so that it has the orange highlighted box around it. The diskette
icon in the image toolbar ( near the top of
the screen) will allow you to save that currently selected image as a
FITS or PNG or even a ds9 regions file to your local disk. Note that
you control where the file is saved on your disk through your
browser; your browser may be configured to store all downloads in a
particular location on your disk.
near the top of
the screen) will allow you to save that currently selected image as a
FITS or PNG or even a ds9 regions file to your local disk. Note that
you control where the file is saved on your disk through your
browser; your browser may be configured to store all downloads in a
particular location on your disk.
Saved FITS images will not save the color stretches or overlays; it
will just save the underlying FITS image. Saved PNG files WILL
include any overlays or annotations you have placed on the image, but
will not include the underlying FITS image. Saved regions files will
not save the underlying image, but will just save the overlays as a
DS9 Regions file. See the DS9 website for more information on the syntax of
these DS9 region files.
To save multiple images, identify the row(s) in the table you wish to
save. Click on the tickbox on the far left of that row. Select as many
as you want; click on the tickbox at the top of the column to select
all.
Now, go up to the upper right and click "Prepare Download." It will
give you a pop-up:
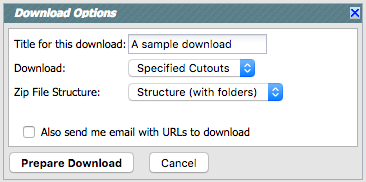
From here, you can specify:
- the title of the download (used in the filenames it will create);
- whether you want the full images or just the cutouts that are
displayed in the tool;
- whether you want the file structure to be binned such that each
epoch is in a different subdirectory (structured) or with all the
files at the same level in the directory hierarchy (flattened);
- whether you want it to send you email when it is done (and if you
select that, you can enter your email address).
If it is a small download, it might ask you right away where to put
the file on your disk.
If it is a big download, the packaging process will spin off to the
"Background monitor" in the upper right. Click on that blue tab to
watch it package, and enter an email if you want it to email you when
it is done.
Note that even if you were working with just one WISE channel,
the images from all available channels will be included in the
download.
Go back to Main Screen, After Period Finding.